Getting Traefik, Health checks and Dashboards on a Nomad Cluster
Part 4 of Avoiding the Cloud series: Step by step guide on how to get Traefik, whoami, Consul and Nomad working together

Paul
This is Part 4 of the Avoiding the Cloud series. This step is dependent on the provider you use. I'll use TransIP as the example, but all load balancers should be able to do something similarly.
In Part 2: Reproducibly provisioning Salt Minions on TransIP, we provisioned 4 different VPSs with just a Salt Minion and the hostnames and IP address that we defined in Part 1: Building a Docker cluster with Nomad, Consul and SaltStack on TransIP.
In Part 3: Provisioning Consul, Nomad and Gluster with SaltStack you created a central SaltStack configuration that defined and configured all nodes to their correct configuration.
In this part of the series we will deploy our own load balancer on our docker hosts, add a health check for the provider's load balancers to use, and make dashboards available to monitor our cluster.
Just like in the other parts, whenever I talk about putting specific contents in a file, I'll leave it up to you to pick your preferred way. Personally I use vi, but nano is present as well.
Recap
We have built a single column of our redundant Docker cluster with Nomad, Consul and Gluster. With column, I mean that we have one of each node type, and not yet a redundant system.
We have a private IP layout defined and we have set roles for each of our four node types. We use SaltStack to arrange our configuration states on our different nodes. SaltStack works declarative. You define a wanted 'state' on you minions, and ask the Salt Master to apply the state to the relevant Salt Minions.
In this part we'll install our cluster's load balancer, which must not be confused with the provider's load balancer. The provider's load balancer distributes traffic from the internet to our Docker hosts. Our cluster load balancer distributes traffic to the actual services we have running.
Setting up our Traefik load balancer and Health check
The job of your provider's Load Balancer (a HA-IP in case of TransIP) is to send traffic to our docker nodes. We only have one at this moment, but still. The docker node itself needs to distribute the traffic to the correct docker service. So we need something hosted on our docker hosts that does that for us. One of the most used tools to do this is Traefik.
To get the ball rolling, you will have to start two Nomad jobs on our cluster.
Traefik as a system service that will be available on each docker host and is there to distribute traffic from the Load Balancer to the appropriate docker service.
WhoAmI image that provides a simple and elegant health check for the Load Balancer to verify that our nodes are up and ready to receive traffic.
Defining Nomad jobs
We'll start with our Traefik job. If you've never used Traefik before, it might seem like a bit of gobbledygook. Traefik is very flexible and is aware of available services and configuration (via Consul) if we tell it about Consul.
Let's place our Traefik plan in /srv/salt/data/plans/traefik.nomad:
job "traefik" {
  datacenters = ["dc1"]
  type        = "system"

  group "traefik" {
    network {
      port "http" {
        static = 8080
      }
    }

    service {
      name = "traefik"

      check {
        name     = "alive"
        type     = "tcp"
        port     = "http"
        interval = "10s"
        timeout  = "2s"
      }
    }

    task "traefik" {
      driver = "docker"

      config {
        image        = "traefik:v2.4"
        force_pull   = true
        network_mode = "host"

        volumes = [
          "local/traefik.toml:/etc/traefik/traefik.toml",
        ]
      }

      template {
        data = <<EOF
[entryPoints]
    [entryPoints.http]
    address = ":8080"
        [entryPoints.http.forwardedHeaders]
        trustedIPs = ["136.144.151.253","136.144.151.254","136.144.151.255","89.41.168.61","89.41.168.62","89.41.168.63"]

# Enable Consul Catalog configuration backend.
[providers.consulCatalog]
    prefix           = "traefik"
    exposedByDefault = false

    [providers.consulCatalog.endpoint]
      address = "127.0.0.1:8500"
      scheme  = "http"

[providers.consul]
    rootKey = "traefik"
    endpoints = ["127.0.0.1:8500"]
EOF

        destination = "local/traefik.toml"
      }

      resources {
        cpu    = 100
        memory = 128
      }
    }
  }
}
That's a lot of lines. Let's run through it first:
At the top a job is created with the name
traefik, it runs in our only datacenter known to Nomad, and it's defined as a system job. Being a system job, it runs on every node, and is not 'scheduled' on nodes by Nomad as regular jobs are.Then a group is defined with:
The static network port
8080, which will be our single entrypoint for all services (from the provider's load balancer's perspective.The definition of the service
traefikthat will be visible in Consul service discovery and instructions on how to check if this job is still aliveThe actual task which uses Docker, and the newest
traefik:v2.4image. As Traefik should be actually bound to our external network interfaces, it's in host network mode. Traefik's configuration file is defined in the template below and mounted in the Docker container when it's running.
Traefik's configuration defines:
Port 8080 as the entrypoint, with the IP addresses of the provider's load balancer as trusted IPs. This is necessary so we can see the external IP of the system connecting to us, instead of the IP of the load balancer connecting to us. (Hint: You should put your assigned load balancer IP's here)
The Consul Service Discovery catalog as a data provider to Traefik. This is where Traefik figures our which services are available, so it can then check how to 'publish' the service itself.
The Consul Key Value store as an additional data provider to Traefik. The Key Value store is a very powerful tool that we'll use to store configuration values and secrets so they don't need to be in the Nomad plans or in our repository as files.
The health job is a lot simpler. We'll place it in /srv/salt/data/plans/whoami.nomad:
job "whoami" {
  datacenters = ["dc1"]
  type        = "system"

  group "whoami" {
    network {
      port "http" {
        to = -1
      }
    }

    service {
      name = "whoami"
      port = "http"

      tags = [
        "traefik.enable=true",
        "traefik.http.routers.whoami.rule=Path(`/health`)",
      ]

      check {
        type     = "http"
        path     = "/"
        interval = "2s"
        timeout  = "2s"
      }
    }

    task "server" {
      env {
        PORT    = "${NOMAD_PORT_http}"
        NODE_IP = "${NOMAD_IP_http}"
      }

      driver = "docker"

      config {
        image = "jwilder/whoami:latest"
        ports = ["http"]
      }
    }
  }
}
In this job specification we only have a single group whoami that includes a HTTP port (where we don't care about the actual port number used), our service, and our task. We tell the jwilder/whoami image that it should use the nomad assigned IP and port number for its service. Using tags we tell Traefik to make this task available at /health on each node.
We want our plans to be available on our Nomad servers, so we'll add the following state at the and of /srv/salt/nomad_server.sls:
/home/boss/plans:
  file.recurse:
    - source: salt://plans
    - user: boss
    - group: boss
    - dir_mode: 755
    - file_mode: 644
This makes our plans available in boss' home directory.
We can now refresh the pillar data, and apply our new state requests:
$ sudo salt '*' state.apply
Now we can start and run our jobs on our cluster. First we need to make a single root Key Value for Traefik in the Consul Key Value store.
$ sudo salt 'consul-server-01' cmd.run "consul kv put traefik"
consul-server-01:
    Success! Data written to: traefik
Great, now we can plan our Traefik job. Within Nomad you first have to plan a job and it will do a dry-run and tell you what the consequences of running the job are. Only then can you submit the job for real. To plan our job:
$ sudo salt 'nomad-server-01' cmd.run "nomad job plan /home/boss/plans/traefik.nomad"
nomad-server-01:
    + Job: "traefik"
    + Task Group: "traefik" (1 create)
      + Task: "traefik" (forces create)

    Scheduler dry-run:
    - All tasks successfully allocated.

    Job Modify Index: 0
    To submit the job with version verification run:

    nomad job run -check-index 0 /home/boss/plans/traefik.nomad

    When running the job with the check-index flag, the job will only be run if the
    job modify index given matches the server-side version. If the index has
    changed, another user has modified the job and the plan's results are
    potentially invalid.
ERROR: Minions returned with non-zero exit code
Ok, so Nomad's dry-run scheduler is telling us it can run this job by creating the traefik task group. And it tells us the command we need to run to actually submit the job: nomad job run -check-index 0 /home/boss/plans/traefik.nomad. So let's do that:
$ sudo salt 'nomad-server-01' cmd.run "nomad job run -check-index 0 /home/boss/plans/traefik.nomad"
nomad-server-01:
    ==> Monitoring evaluation "9ffc9f8e"
        Evaluation triggered by job "traefik"
    ==> Monitoring evaluation "9ffc9f8e"
        Allocation "28ae4eb8" created: node "c3f596de", group "traefik"
        Evaluation status changed: "pending" -> "complete"
    ==> Evaluation "9ffc9f8e" finished with status "complete"
Ok.. Traefik should now be running after it's downloaded. Let's start the health check job as well. First we plan it:
$ sudo salt 'nomad-server-01' cmd.run "nomad job plan /home/boss/plans/whoami.nomad"
nomad-server-01:
    + Job: "whoami"
    + Task Group: "whoami" (1 create)
      + Task: "server" (forces create)

    Scheduler dry-run:
    - All tasks successfully allocated.

    Job Modify Index: 0
    To submit the job with version verification run:

    nomad job run -check-index 0 /home/boss/plans/whoami.nomad

    When running the job with the check-index flag, the job will only be run if the
    job modify index given matches the server-side version. If the index has
    changed, another user has modified the job and the plan's results are
    potentially invalid.
ERROR: Minions returned with non-zero exit code
Then we actually run it:
$ sudo salt 'nomad-server-01' cmd.run "nomad job run -check-index 0 /home/boss/plans/whoami.nomad"
nomad-server-01:
    ==> Monitoring evaluation "e48626ed"
        Evaluation triggered by job "whoami"
    ==> Monitoring evaluation "e48626ed"
        Allocation "b01f8094" created: node "c3f596de", group "whoami"
        Evaluation status changed: "pending" -> "complete"
    ==> Evaluation "e48626ed" finished with status "complete"
Let's wait for half a minute!
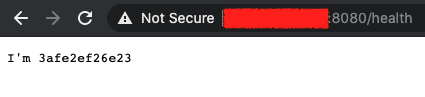
If you now go to your docker nodes public IP in your browser on port 8080 at /health (e.g. http://IPADDRESS:8080/health), you should see something like this:
If you see that, it means that we can configure the provider's load balancer to be able to verify the health check and put your docker host online.
In your TransIP Control Panel, go to your BladeVPS overview and select your HA-IP. Then first set the HA-IP's configuration like this:
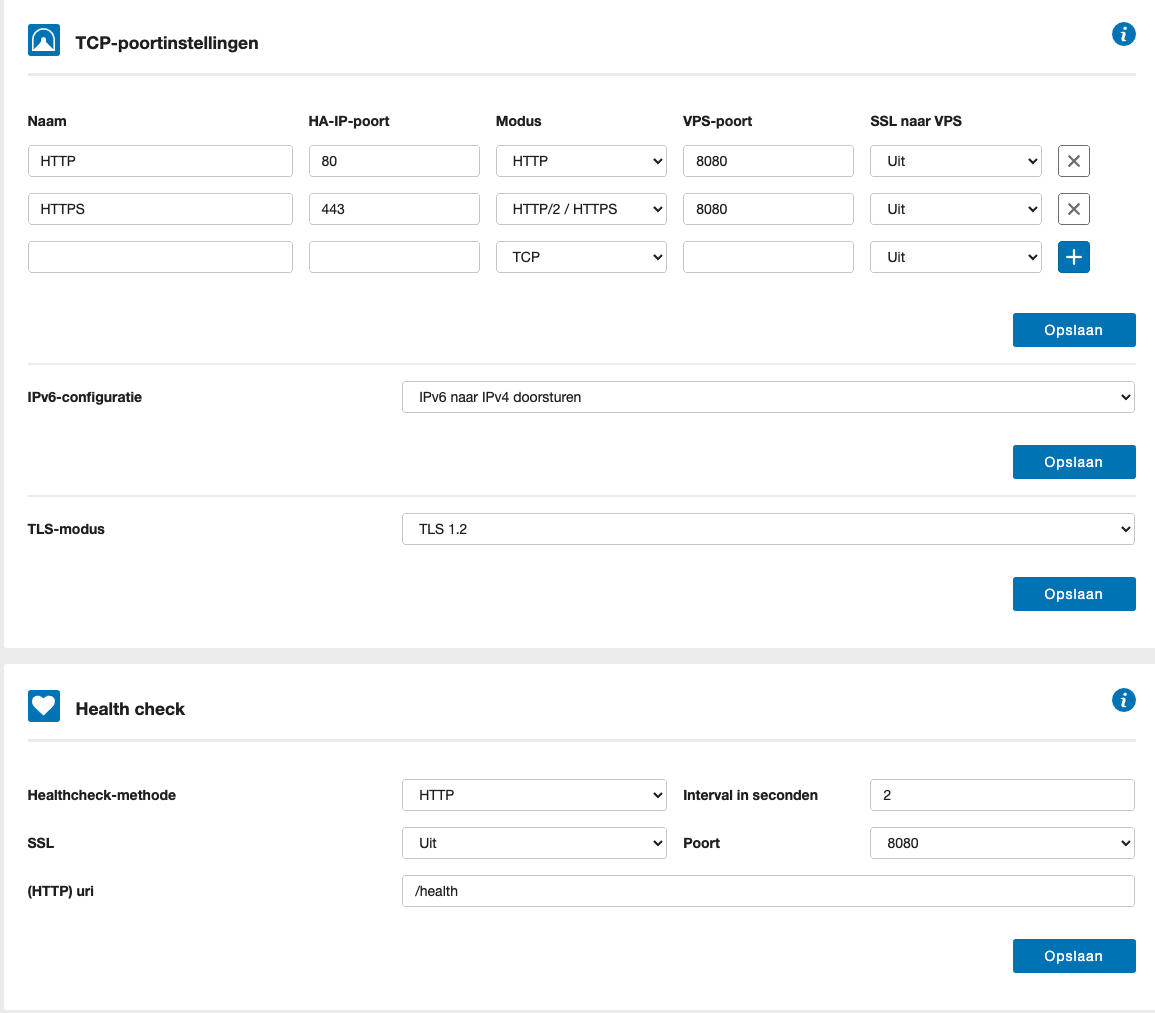
We'll redirect both the http (80) and https port (443) to VPS port 8080 without SSL. And we'll tell the HAIP to do IPv6 to IPv4 translation, so we only need to support IPv4, and we set the health check to use HTTP on port 8080 with our /health endpoint.
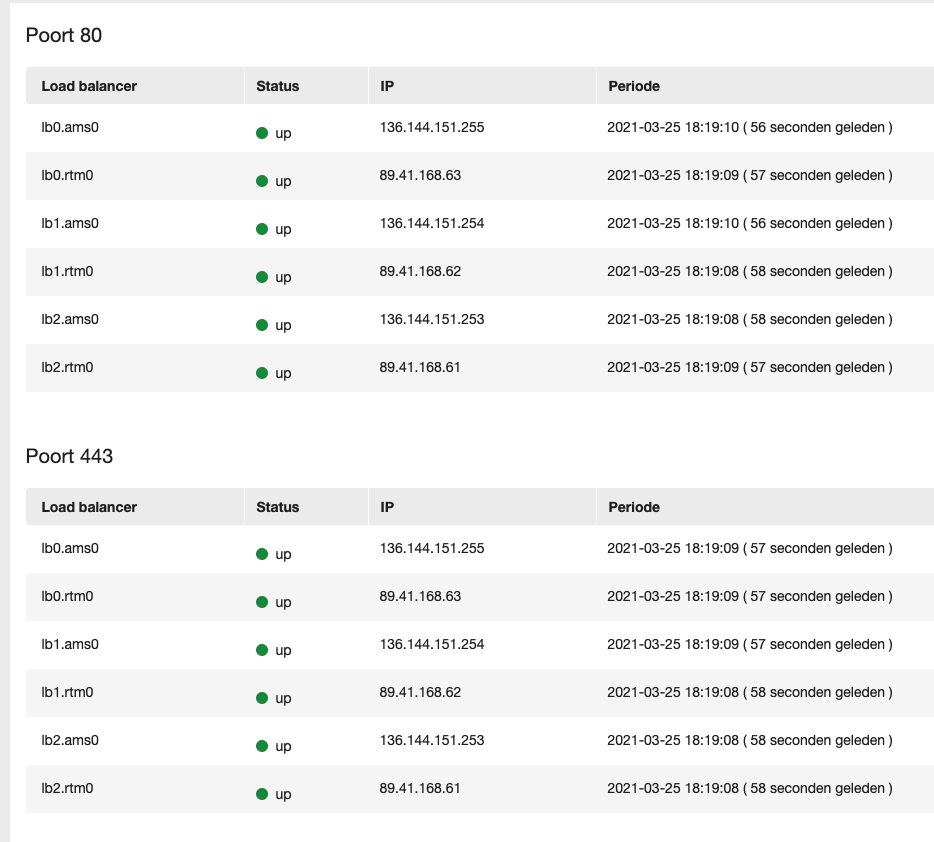
Now you can couple your docker-01 VPS to the HAIP and you should see the status flip to green and show something like this:
Great. We now have a working channel from our provider's load balancer into our Docker cluster via Traefik. From the internet's perspective we support IPv4 and IPv6 and HTTPS.
Setting up the dashboards
Now we can see if we can have you access your dashboard. Traefik, Consul and Nomad each have a Dashboard UI with useful info. They each give a way better overview than the commandline versions.
The one problem though is that both Consul and Traefik don't really play nice if they aren't in the root of the URL. Or at least I could not find a way to let them cleanly co-exist. So it's not easy to put them on the same 'domain name'. It goes beyond the scope of this post to solve that. If you do know a way, comment below! So for now what we'll do here is:
Create three local host names that you can use in your browser
Make all three dashboards available through Traefik
So for step one, on your local system (not the Salt Master), you'll need to add your docker hosts IP to /etc/hosts (or the correct location on Windows which I'm not going to bother to lookup). On any Linux/MacOS system it will be:
$ sudo vi /etc/hosts
And the add a line like this:
XX.XX.XX.XX traefik.dashboards.cluster consul.dashboards.cluster nomad.dashboards.cluster
Where you replace the XX.XX.XX.XX with the public IP of your Docker host. That way you can use these three domain names to access the host from your browser, and Traefik can use that to redirect you to the correct Dashboard.
Traefik Dashboard
Let's start with Traefik. In order to activate the Dashboard, you'll need to make 2 changes to /srv/salt/data/plans/traefik.nomad.
First you'll need to adapt the service section to include:
service {
      name = "traefik"

      check {
      <snipped>
      }

      tags = [
        # Dashboard
        "traefik.enable=true",
        "traefik.http.routers.traefik-dashboard.rule=Host(`traefik.dashboards.cluster`)",
        "traefik.http.routers.traefik_dashboard.service=api@internal",
        "traefik.http.routers.traefik_dashboard.entrypoints=http",
        "traefik.http.routers.traefik_dashboard.middlewares=dashboard-auth",
        "traefik.http.middlewares.dashboard-auth.basicauth.users=admin:$apr1$xxxxxxxx$yyyyyyyyyyyyyyyyyyyyyy",
      ]
    }
These tags are read by Traefik on load and tell it to direct traffic to http://traefik.dashboards.cluster:8080 to the internal Dashboard and require Basic Authentication. You'll need to generate a valid basic authentication string first with something like:
$ docker run --rm -ti xmartlabs/htpasswd <username> <password>
In addition you need to enable the actual dashboard by adding the [api] section in the template configuration just before EOF:
<snipped>

[api]
    dashboard = true
EOF
If you now re-deploy Traefik with:
$ sudo salt 'nomad-server-01' state.apply
$ sudo salt 'nomad-server-01' cmd.run "nomad job plan /home/boss/plans/traefik.nomad"

<SNIPPED>

    nomad job run -check-index XXXX /home/boss/plans/traefik.nomad

<SNIPPED>
And then running the job with the correct index (replace XXXX):
$ sudo salt 'nomad-server-01' cmd.run "nomad job run -check-index XXXX /home/boss/plans/traefik.nomad"
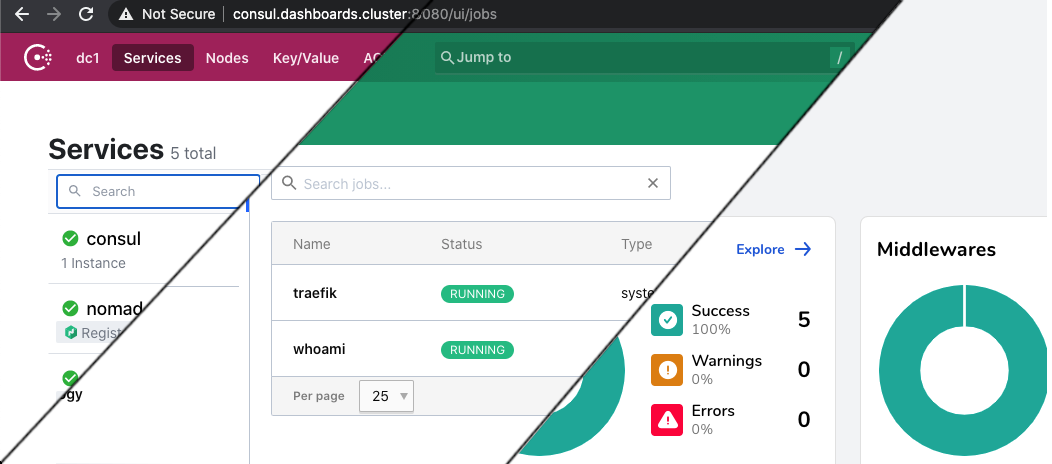
Now you should wait a minute for it to correctly deploy. Then use your browser to go to: http://traefik.dashboards.cluster:8080 and you should see:
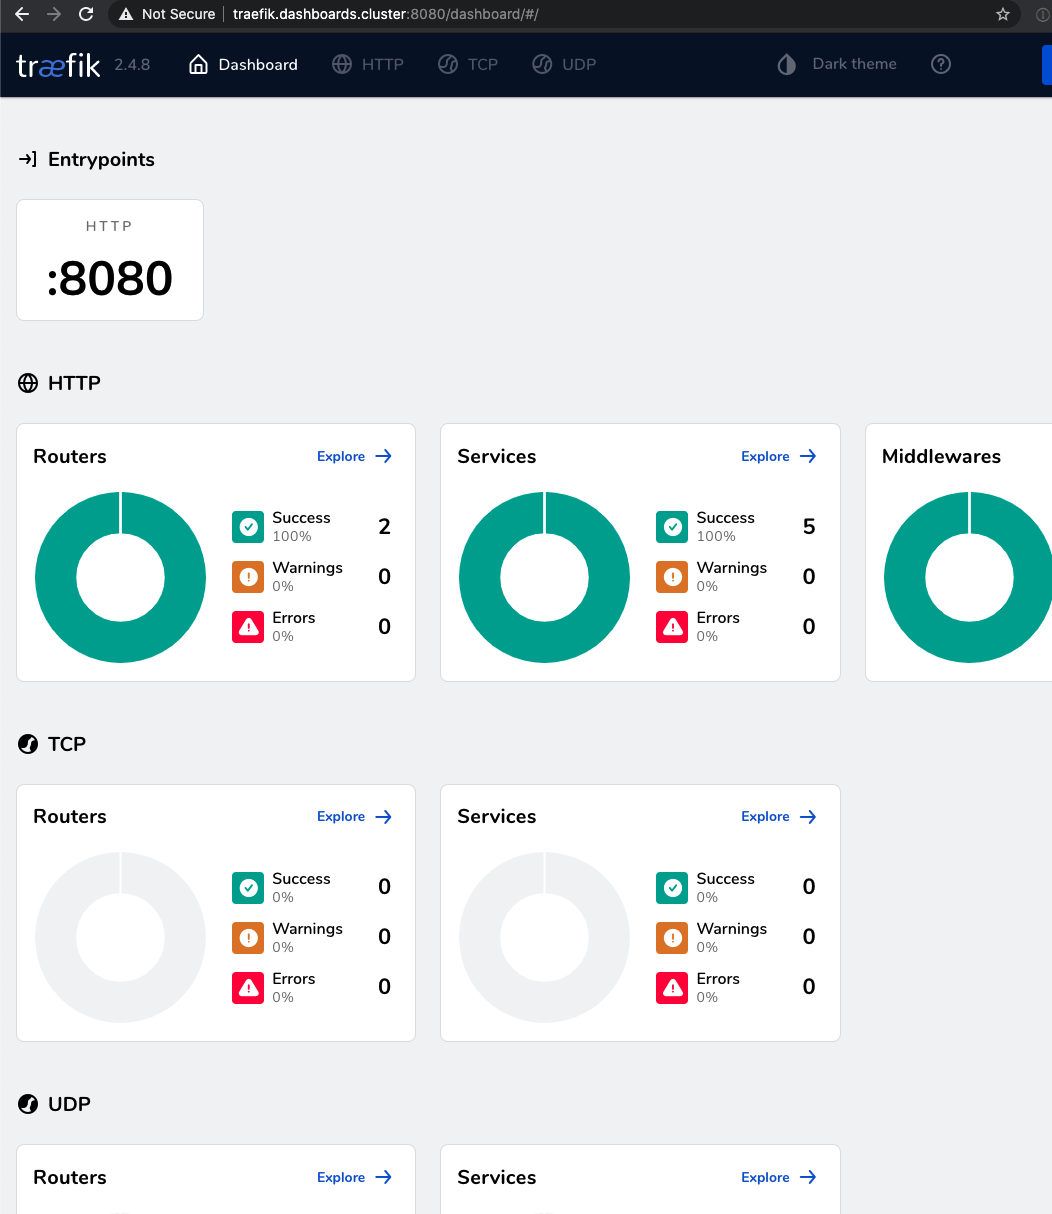
One down, two to go.
Consul Dashboard
For the Consul Dashboard we'll first create a Traefik load balancing service, to tell it to redirect traffic to act as a proxy for another webserver. This is considered 'dynamic configuration' by Traefik, and that should be stored as a Consul Key/Value. We can add it from the commandline:
$ sudo salt 'consul-server-01' cmd.run "consul kv put traefik/http/services/consul-ui/loadBalancer/servers/0/url http://127.0.0.1:8500/"
consul-server-01:
    Success! Data written to: traefik/http/services/consul-ui/loadBalancer/servers/0/url
Then we add another few tags in /srv/salt/plans/traefik.nomad:
"traefik.http.routers.consul.rule=Host(`consul.dashboards.cluster`)",
        "traefik.http.routers.consul.service=consul-ui@consul",
        "traefik.http.routers.consul.entrypoints=http",
        "traefik.http.routers.consul.middlewares=dashboard-auth",
And again.. If you now re-deploy Traefik with:
$ sudo salt 'nomad-server-01' state.apply
$ sudo salt 'nomad-server-01' cmd.run "nomad job plan /home/boss/plans/traefik.nomad"

<SNIPPED>

    nomad job run -check-index XXXX /home/boss/plans/traefik.nomad

<SNIPPED>
And then running the job with the correct index (replace XXXX):
$ sudo salt 'nomad-server-01' cmd.run "nomad job run -check-index XXXX /home/boss/plans/traefik.nomad"
Now you should wait a minute for it to correctly deploy. Then use your browser to go to: http://consul.dashboards.cluster:8080 and you should see:
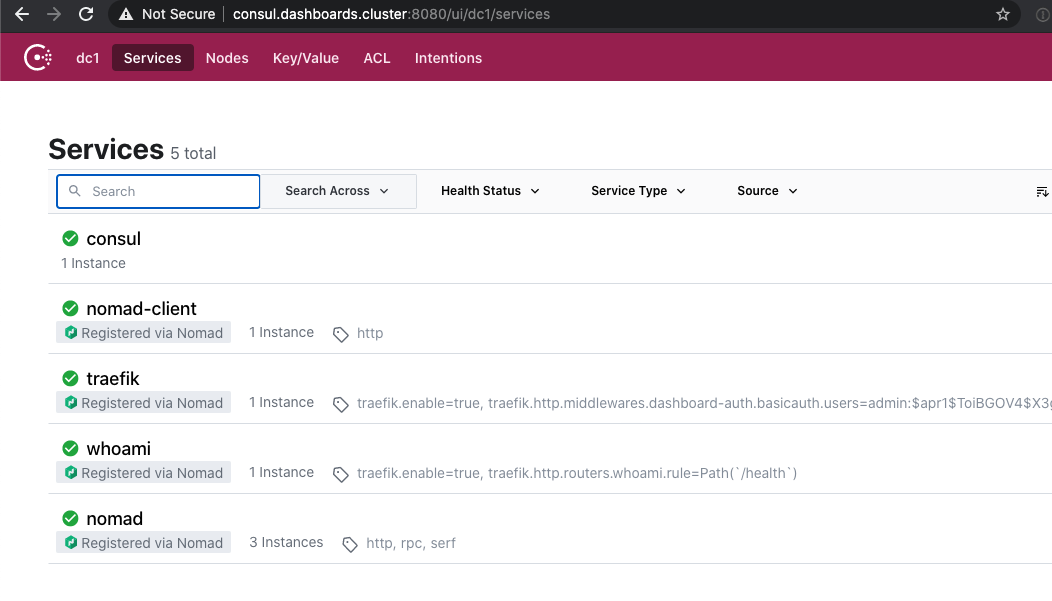
Two down, one to go!
Nomad Dashboard
Only the Nomad Dashboard to go. This one is nearly identical to the Consul Dashboard. First we define the nomad-ui service in a Key/Value for Traefik in Consul. But because Nomad is not bound to localhost, we cannot use 127.0.0.1. Luckily Consul Service Discovery comes to the rescue. We can just ask it to give us an IP by querying for nomad-client.service.consul instead:
$ sudo salt 'consul-server-01' cmd.run "consul kv put traefik/http/services/nomad-ui/loadBalancer/servers/0/url http://nomad-client.service.consul:4646/"
consul-server-01:
    Success! Data written to: traefik/http/services/nomad-ui/loadBalancer/servers/0/url
Then we add another few tags in /srv/salt/plans/traefik.nomad:
"traefik.http.routers.nomad.rule=Host(`nomad.dashboards.cluster`)",
        "traefik.http.routers.nomad.service=nomad-ui@consul",
        "traefik.http.routers.nomad.entrypoints=http",
        "traefik.http.routers.nomad.middlewares=dashboard-auth",
And again.. If you now re-deploy Traefik with:
$ sudo salt 'nomad-server-01' state.apply
$ sudo salt 'nomad-server-01' cmd.run "nomad job plan /home/boss/plans/traefik.nomad"

<SNIPPED>

    nomad job run -check-index XXXX /home/boss/plans/traefik.nomad

<SNIPPED>
And then running the job with the correct index (replace XXXX):
$ sudo salt 'nomad-server-01' cmd.run "nomad job run -check-index XXXX /home/boss/plans/traefik.nomad"
Now you should wait a minute for it to correctly deploy. Then use your browser to go to: http://nomad.dashboards.cluster:8080 and you should see:
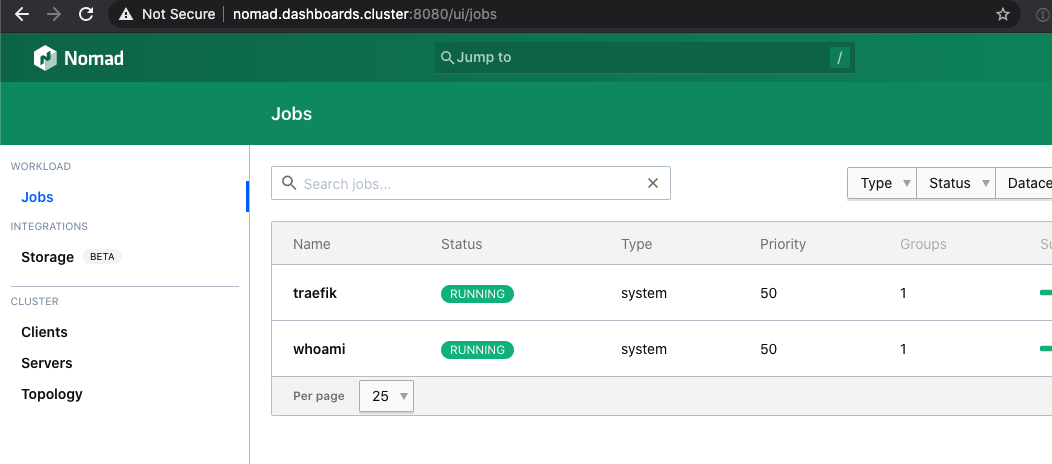
All done. You now have access to your dashboards. That concludes this part of the series. You now have a complete cluster (single host per node type) that actually works from Load Balancer to Health Check. And you have personal access to the dashboards. Now you should relax and play around with additional jobs.
In Part 5 you'll add redundancy by adding new nodes.
Extra steps you might need
We now have a working setup. But you probably will need additional steps to make your cluster support your project. Some of those steps I'll describe below. If you have any other questions don't hesitate to comment below!
Supporting private docker repositories
Most likely you don't want to publish just public docker images. You probably have some images in Docker Hub or a private repository. By default your Nomad clients that receive the instructions to initiate a new job with a private image, don't have access to that private repository.
The easiest way to achieve this is to locally run sudo docker login on each docker host in our cluster. After that login information is present on the docker host, we can tell Nomad to use it for downloading images by adding a new top level block to /srv/salt/nomad.d/client.hcl:
client {
  <EXISTING_VALUES>
}

plugin "docker" {
  config {
    auth {
      config = "/root/.docker/config.json"
    }
  }
}
And to make sure we notice in advance when there is a docker host that doesn't yet have the docker credentials, we add to /srv/salt/nomad_client.sls
docker login present:
  file.exists:
    - name: /root/.docker/config.json
Using Gluster volumes
Some of your jobs will use persistent data. That's why we setup the Gluster node. To support persistent data in a distributed way and allow easy use.
So assuming you created a directory /data/storage/my-app-data to persist data for your app, we need to make Nomad aware of that directory and create a host_volume that can be used in your Nomad plans.
To add a host_volume you'll need to add its definition into /srv/salt/nomad.d/client.hcl within the client block:
client {
  <EXISTING_VALUES>

  host_volume "my-app-data" {
    path      = "/data/storage/my-app-data"
    read_only = false
  }
}
And of course you'll need to apply the new state to your docker nodes.